Basic Features
You can use PowerPoint as a visual aid for oral presentations. In addition to creating slides to project during presentations, the program generates notes pages for speakers and handouts for audience members. You may also save your slides as a web page that anyone with a web browser can view.
Getting In
Click on the PowerPoint icon ![]() on the toolbar, or select PowerPoint from the program options on the Startmenu.
on the toolbar, or select PowerPoint from the program options on the Startmenu.
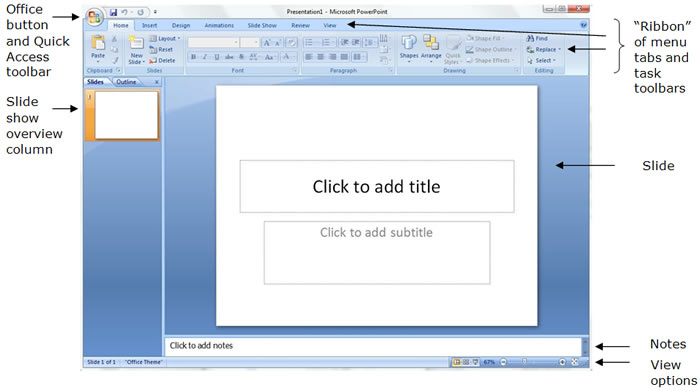
The PowerPoint workspace is subdivided into several sections. The slide appears as a white rectangle in the largest segment of the PowerPoint screen. The slide contains the information that will appear when you project your show. The column on the left side of the screen provides an overview of the entire slide show; you can reorganize the presentation by clicking and dragging slides within the column. You can use the rectangular box at the bottom of the screen to type notes regarding the slide’s content. The wide band, or “ribbon,” at the top of the window presents toolbars related to specific tasks. The toolbar options change according to your menu choice, selected by clicking on the corresponding menu tab. General functions are available via the Office Button Menu and may be added to the quick options bar.
Getting Around
Clicking the Office Button allows you to access the “New,” “Open,” “Save,” “Save As,” “Publish” and “Print” commands, among other options. The Quick Access Toolbar displays the “Save,” “Undo” and “Redo” icons; using the drop-down menu, you may customize this toolbar to include other frequently used commands.
Selecting the menu tabs opens the following toolbars:
Home: Includes cut, copy, and paste; slide creation and layout tools; text and paragraph formatting options; drawing tools; and the find/replace feature.
Insert: Contains tools for adding tables, graphics, links, text and media to slides.
Design: Has page setup options, design themes, and tools to edit slides’ background, fonts, and color schemes.
Animations: Features options for animating slide elements and slide transitions.
Slide Show: Includes tools for beginning a slide show, setting up custom slide shows within the same slide presentation, creating self-contained slide shows, rehearsing your presentation, setting the resolution of projected slides, and applying “presenter view,” which projects full-screen slides on one screen and speaker notes on another.
Review: Has tools for proofreading, commenting on, and restricting access to a presentation.
View: Allows access to various presentation views (for example, normal, slide sorter, and handouts master); also includes options for increasing or decreasing slide size and creating and moving between multiple windows.
Contextual Menus: Are not displayed on the main screen, but open as needed to provide additional options. For example, the “Drawing Tools” and “Picture Tools” menus feature graphics formatting alternatives.
![]()
Slide Design, Layout and Color
Adding Slides
PowerPoint will display a title slide when you open the program. You can enter text directly in the slide boxes as indicated. To add slides to your presentation, click the New Slide ![]() icon on the Home toolbar.
icon on the Home toolbar.
Selecting Slide Layout
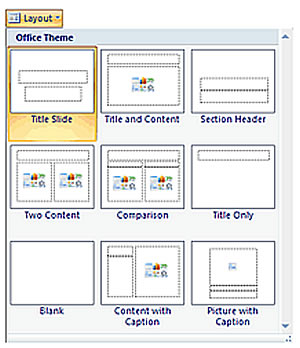
Click the Layout drop-down menu from the Home tab and choose from the preset layouts displayed.
Selecting Slide Design, Colors and Fonts
PowerPoint offers a wealth of slide design options. Click the Design tab to access built-in designs, colors and fonts. The toolbar will display pictures of all available choices.
To select slide design: Click the Design tab and choose a built-in theme from the options displayed.
To change slide color: If you do not like the colors of your selected theme, or if those colors do not project well on a large screen, then you may choose alternate colors. Click the Colors drop-down menu from the Design tab. Pictures of built-in color schemes will appear. You may also choose Create New Theme Colors to set custom colors for all slide elements.
To change slide fonts: Click the Fonts drop-down menu from the Design tab. A list of built-in font schemes will appear. You may also choose Create New Theme Fonts to set custom heading and body text fonts.
![]()
Formatting Text
The Font tools on the Home tab allow users to change font type, size, capitalization, color and weight:
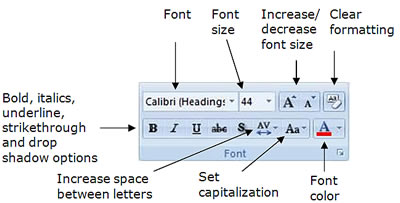
The Home tab’s Paragraph tools include text spacing, alignment, indenting, text direction and list formatting options:
![]()
Inserting Pictures, Tables, Diagrams, Charts, and Media
PowerPoint provides two ways to add pictures, tables, diagrams, charts, and media clips to a slide: the Inserttoolbar and icon shortcuts on the slide itself. To view the icon shortcuts, you must first select a slide layout that includes pictures, tables, diagrams, charts, or media.

To add a table: Click the drop-down arrow below the Table icon on the Insert toolbar and highlight the number of rows and columns you want in your table. You may also select the Table icon on the slide itself, typing the number of rows and columns into the dialogue box that appears and clicking OK.
To add a diagram: PowerPoint’s SmartArt tool provides built-in list, timeline, hierarchy, cycle, and pyramid diagrams. To add a diagram, click the SmartArt icon on the Insert toolbar or on the slide itself. A dialogue box will open to display diagram types. Select the diagram icon for a preview and description of the relationship or process the diagram illustrates. Choose the diagram you want, click OK, and add text as prompted. To access a text entry box that allows you to add fields to the diagram, click the arrow icons next to the diagram. You may use the Smart Art contextual toolbars to change diagram colors and layout.
To add a chart: Click the Chart icon on the Insert toolbar or on the slide itself. A dialogue box displaying chart options—for example bar, pie, line, etc.—will appear. Select a chart and click OK. A spreadsheet with sample data will open. Change the information and close the spreadsheet. Your selected chart, with the data you entered, will appear on the slide. You may use the “Chart Tools” contextual toolbars to edit chart data and modify design and layout.
To add clip art or a picture: Click the Picture or Clip Art icon on the Insert toolbar or on the slide itself. When you click Picture, an insert box will appear. Browse for the desired image and click Insert. When you select Clip Art, a search window will appear in a column to the right of the slide. Enter the category of clip art you want (“animals,” “people,” “computers,” etc.) and choose an appropriate graphic from the selections that appear. The “Picture Tools” contextual toolbar allows you to crop, adjust the brightness and color, add effects, or place a border around your images.
To add a movie: Click the Movie icon on the Insert toolbar or on the slide itself. An insert box will appear. Browse for the desired file and click OK. A box will open asking if you would like the movie to start automatically or when clicked. The first frame of your movie will appear on the slide. You may use the “Movie Tools” contextual toolbar to specify how you want to display and play the film clip. Please note that PowerPoint will only play film files in .avi, .mpg or Windows media formats.
To add a sound clip: Click drop-down menu below the Sound icon on the Insert toolbar. You may choose to add a sound file, to record a sound, or to play a track from a CD. If you choose the “Sound from File” option, browse for the desired file in the insert box that appears and click OK. To record a sound, select “Record Sound,” click the record button on the box that appears, record your sound, and click OK. To play music from a CD during your presentation, select “Play CD Audio Track,” specify the tracks you wish to begin and end upon, and click OK. When you add sound files or CD tracks, a box will open asking if you would like the sound to start automatically or when clicked. After you add a sound, a sound or CD icon will appear on the slide. You may use the “Sound Tools” or “CD Audio Tools” contextual toolbar to preview your sound, select a volume, or specify whether you want to loop the sound.
![]()
Inserting Hyperlinks
PowerPoint allows users to insert links to documents on an individual computer or network, to sites on the web, or to email addresses. Please note that email links work only if the computer’s mail program is configured with an individual user’s account information.
To insert a hyperlink to a document on the computer or network: Highlight the text you want to link, open theInsert toolbar and click the Hyperlink ![]() icon. In the hyperlink box that appears, select Existing File or Web Page and use the drop-down menu next to the Look in box to browse for the desired file. The file name will appear in the Address box. Click OK.
icon. In the hyperlink box that appears, select Existing File or Web Page and use the drop-down menu next to the Look in box to browse for the desired file. The file name will appear in the Address box. Click OK.
To insert a hyperlink to a web site: Highlight the text to be linked, open the Insert toolbar and click theHyperlink ![]() icon. In the hyperlink box, choose Existing File or Web Page. If you know the page URL, type it in the Address box and select OK. You must type the entire URL—including the “http://”—in order for the link to work. If you do not know the URL, use the drop-down menu next to the Address line to view recently browsed pages. You may also click the Browse the Web icon
icon. In the hyperlink box, choose Existing File or Web Page. If you know the page URL, type it in the Address box and select OK. You must type the entire URL—including the “http://”—in order for the link to work. If you do not know the URL, use the drop-down menu next to the Address line to view recently browsed pages. You may also click the Browse the Web icon ![]() to launch a web browser, and search for a page. After copying and pasting the URL from the browser into PowerPoint’s Address line, click OK.
to launch a web browser, and search for a page. After copying and pasting the URL from the browser into PowerPoint’s Address line, click OK.
To insert a hyperlink to an email address: Highlight the text to be linked, open the Insert toolbar and click theHyperlink ![]() icon. In the hyperlink box, choose E-mail Address; type the recipient’s address and the message subject in the To and Subject boxes. You may also select a recipient from the list of recently used email addresses displayed in the hyperlink box. Click OK.
icon. In the hyperlink box, choose E-mail Address; type the recipient’s address and the message subject in the To and Subject boxes. You may also select a recipient from the list of recently used email addresses displayed in the hyperlink box. Click OK.
![]()
Adding Speaker Notes
To add speaker notes to the slide, type in the Notes box below the slide. These notes will not appear when the slide show is projected. You may print your notes by clicking the Office Button, selecting Print and choosingNotes Pages from the Print what drop-down menu.
Adding Comments
PowerPoint’s comment function is useful for groups collaborating on a presentation; each student may comment on another’s section. To add a comment, highlight the slide element you wish to comment upon, open the Reviewtoolbar and click the New Comment ![]() icon. Type your remarks in the yellow box that appears.
icon. Type your remarks in the yellow box that appears.
Editing a Slide Presentation
PowerPoint’s slide sorter view offers a simple way to edit individual slides and entire presentations. To access the slide sorter, select the View tab and click the Slide Sorter ![]() icon on the toolbar. The icon is also located on the bottom right side of the screen, below the Notes box.
icon on the toolbar. The icon is also located on the bottom right side of the screen, below the Notes box.
To add a slide: Click in a space before, after, or between existing slides. Open the Home toolbar and click theNew Slide![]() icon.
icon.
To delete a slide: Click on the slide, open the Home toolbar and click the Delete Slide ![]() icon.
icon.
To edit an individual slide: Double-click on the slide to edit; this will return the screen to the Normal view.
To change the slide order: Click and drag slides to reorder them.
Saving a Slide Presentation
PowerPoint allows you to save presentations in several formats, including PDF and web page. To view all saving options, click the Office Button and choose Save As. You will see the following options: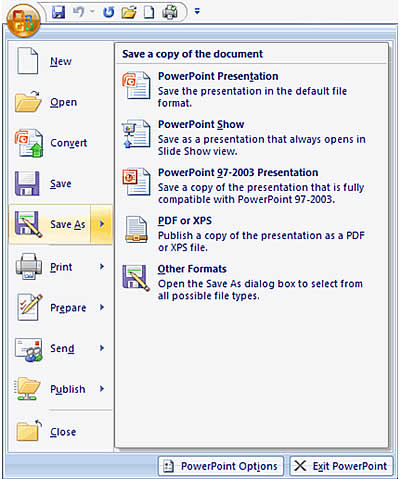
PowerPoint Presentation: Saves the presentation in PowerPoint 2007 “.docx” format.
PowerPoint Show: Saves the presentation in a format that automatically opens as a slide show in PowerPoint 2007.
PowerPoint 1997-2003: Saves the presentation in a format compatible with earlier versions of PowerPoint.
PDF or XPS: Saves the presentation in shareable Adobe Portable Document or XML Paper Specification format. In order to save in these formats, you must download an add-in from http://www.microsoft.com/downloads.
Other Formats: Allows you to choose among multiple file formats. To save the presentation as a web page, selectWeb Page (*.htm; *.html) from the Save as type options. You can then click the Publish button to customize the appearance of your page.
Viewing a Slide Presentation
PowerPoint’s Slide Show toolbar offers several options for projecting your slide presentation:
To view the presentation from the beginning: Select the Slide Show tab and click the From Beginning ![]() icon. The first slide will appear in full-screen view. Press the Enter key or click the mouse to advance through the presentation.
icon. The first slide will appear in full-screen view. Press the Enter key or click the mouse to advance through the presentation.
To view the presentation from the current slide: Select the Slide Show tab and click the From Current Slide ![]() icon. Alternatively, you may select the Slide Show icon
icon. Alternatively, you may select the Slide Show icon ![]() on the bottom right side of the screen. The current slide will appear in full-screen view. Press the Enter key or click the mouse to advance through the presentation.
on the bottom right side of the screen. The current slide will appear in full-screen view. Press the Enter key or click the mouse to advance through the presentation.
To hide a slide from view: Select the slide, open the Slide Show toolbar and click the Hide Slide ![]() icon. The hidden slide will be highlighted in the slide show overview column. When you deliver your presentation, the hidden slide will not be projected. To project the slide, select it and deselect the Hide Slide icon.
icon. The hidden slide will be highlighted in the slide show overview column. When you deliver your presentation, the hidden slide will not be projected. To project the slide, select it and deselect the Hide Slide icon.
To create a custom slide show: PowerPoint allows you to create multiple versions of the same presentation. For example, you may want to prepare fifteen-minute and thirty-minute talks from the same set of slides. To do so:
- Open the Slide Show toolbar and click the Custom Slide Show
 icon. Select Custom Shows from the drop-down menu.
 - In the custom shows dialogue box that appears, click the New button. A Define Custom Show box will open. Type a name for your slide show, select the slides you want to include, and click Add. When you have finished adding slides, click OK.
- You will return to the Custom Shows box, which will now display the title of your custom show. From here, you may select New to create another custom presentation, choose Show to preview your presentation, or click Close to return to the main PowerPoint screen.
Animating a Slide Presentation
PowerPoint allows users to animate slide text. You can use animation to coordinate slide text with spoken remarks. To animate a slide, open the Animation tab. Highlight the element you want to animate and choose the “Fade,” “Wipe,” or “Fly in” effect from the Animate grouping. Once you select an effect, you will see a preview of your animated slide. To see a preview at any time, click the Preview ![]() icon.
icon.

When you animate slides with the Animation Schemes function, the selected effects will appear as you click the mouse or press the Enter key during a slide show. However, you may want animation effects to occur automatically or in a particular order. To access more precise slide animation options, highlight the slide feature you want to animate (title, text, image, etc.), open the Animations toolbar, and click the Custom Animation ![]() icon. Custom animation options will appear in a new column. The custom animation options let you apply a wide range of animation effects to selected text; to set the order in which animated slide elements appear; to specify whether animated elements will appear with a mouse click or will automatically follow each other; and to choose the speed of certain animation effects.
icon. Custom animation options will appear in a new column. The custom animation options let you apply a wide range of animation effects to selected text; to set the order in which animated slide elements appear; to specify whether animated elements will appear with a mouse click or will automatically follow each other; and to choose the speed of certain animation effects.
Adding Animated Transitions Between Slides
Just as users can animate the features on a slide, they can also animate the transition between slides. To add animated transitions, open the Animations toolbar and select from the options in the Transition to This Slidearea. When you place your mouse over each transition icon, you will see a preview of the transition. TheTransition to This Slide options also allow you to set the transition speed, to add sound effects to the transition, and to specify whether the transition will occur automatically or on a mouse click. If you would like to apply the same transition to the entire show, click the Apply to All ![]() icon.
icon.
Rehearsing a Slide Presentation
PowerPoint includes tools that help you keep presentations within a particular time limit. To access these tools, open the Slide Show toolbar and click the Rehearse Timings ![]() icon. The view will switch to a full-screen slide presentation mode. A Rehearsal timer at the top of the slide counts the minutes you take to talk through an individual slide. Practice your remarks, pausing the timer or resetting it to zero to repeat the slide discussion if necessary. Once you have advanced through all slides, PowerPoint will indicate the total time for the presentation and ask if you want to keep the timings when you next view the show. If you click Yes, PowerPoint will display the presentation in slide sorter view, listing the timing for each slide underneath its icon.
icon. The view will switch to a full-screen slide presentation mode. A Rehearsal timer at the top of the slide counts the minutes you take to talk through an individual slide. Practice your remarks, pausing the timer or resetting it to zero to repeat the slide discussion if necessary. Once you have advanced through all slides, PowerPoint will indicate the total time for the presentation and ask if you want to keep the timings when you next view the show. If you click Yes, PowerPoint will display the presentation in slide sorter view, listing the timing for each slide underneath its icon.
